Intro to Times Zone
Times Zone is one of my newer zany, mish-mash puzzle concepts brought to fruition in a recent posting on The Griddle. As I stated there, it “fuses bits of latin squares, slitherlink-style fences, and Cross the Streams,” the latter of which might not mean much to anyone who doesn’t frequent GM Puzzles.
In an effort to give newer puzzlers a crash course, I’ve decided to break down the sample puzzle from my post and show how to tackle it step-by-step. If you haven’t tried Times Zone before this guide, I hope you will give it a shot after. Let’s get started!
Instructions
- Enter digits into the cells so each row and column has all digits 1 through 6.
- Additionally, draw a single, closed loop connecting nodes along the gridlines to form the ‘Times Zone’.
- Clues outside each row and column label the contents of the corresponding row or column, as split into groups by the loop. They are presented in order.
- Number clues represent either the sum of a group outside the loop or the product of a group inside the loop.
- A question mark represents 1 group of unknown sum or product.
- A star represents 0 or more unknown groups.
Whew, that’s a lot! But there are some bits of information here that should sound familiar: line 1 just says that the finished grid is a Latin square; a proto-sudoku, if you will.
Line 2 says we’re building a loop, which should sound familiar to slitherlink, fences, and masyu enthusiasts. No biggie.
Lines 3-6 are a bit more interesting: the contents of the rows and columns are labeled, in order. That’s good. Lines 5 and 6 say we’ll be encountering some mystery pieces like in Cross the Streams. That’s a bit tough, but still ok. Line 4 says the number clues are sometimes sums, sometimes products. Could get interesting, right? But since we’re splitting the groups based on that loop, and the inside/outside bit controls whether we have a sum or a product, that gives us a clue: adjacent, non-star clues in the same row/column need to alternate between sum and product. So let’s keep that in the back of our minds and take a look at the sample puzzle.
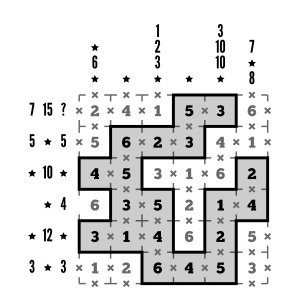
Sample Puzzle
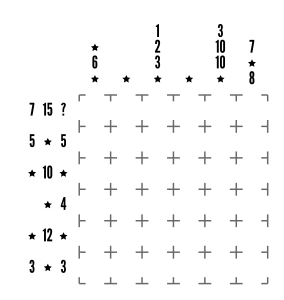
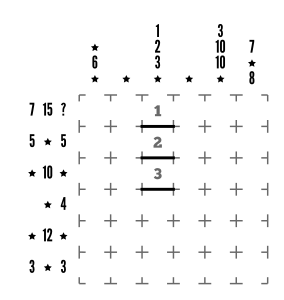
Step 1
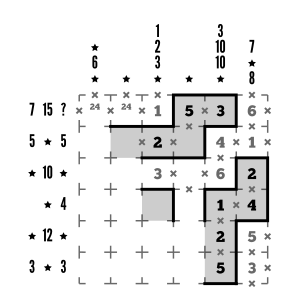
One of the first things that jumps out from this puzzle is some really low-numbered clues. Column 3 starts off with 1, 2, and 3 all in quick succession. The cool thing with a clue of 1 is that it makes the ‘group’ it’s in painfully obvious; only 1 by itself would ever have a sum or product of 1.
As a bonus, this also limits our options for 2 and 3. 2 can be made as either a single digit on its own or as the product of 1×2. Since 1 is already used in the previous group, we’re limited to 2 by itself. Similarly, 3 is either 1×3, 1+2, or 3 by itself, and our previous groups leave the lonesome 3 as the only viable option.
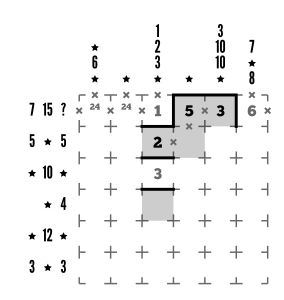
Step 2
Row 1 has a couple of clues paired together that we can decipher now that the 1 has been placed.
7 and 15 could each theoretically be a sum of a bunch of digits, context aside. However, being neighbors, we previously established that one of them has to be a product, and 7 can’t be made by multiplying any of the digits we’ve got kicking. So we now know that the 7 must be a sum of digits and 15 must be a product. Some quick math gives us the viable options:
7 = 1+6, 2+5, 3+4, or 1+2+4, and 15 = 3×5 or 1x3x5
That 15 really narrows down the options for the 7! 2+5 and 3+4 are off the table, so we’re left with 1+6 or 1+2+4. In addition, the far-left positioning means that we can’t use 1+6 since 1 is already in our third column. So we can safely now draft row 1 as follows: 2 or 4, 4 or 2, 1, (loop), 3 or 5, 5 or 3, (loop), and 6.

Step 3
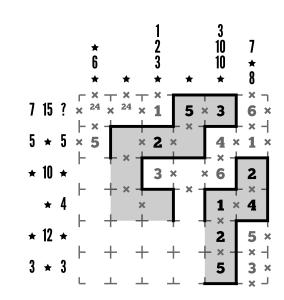
For ease of identifying in vs out, I’ve shaded the interior of the loop-to-be.
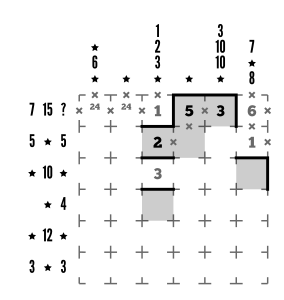
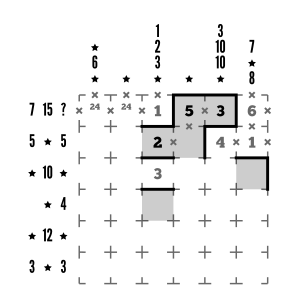
Column 5 does a lovely job of narrowing down the first row’s 3 and 5 by putting the 3 up top. It still might be 3×1, though, so we can’t close off the bottom of R1C5.
Step 4
Column 6’s top clue also helps us immensely by giving us a single possibility for continuation: tack a 1 to the 6 to make 7, then add a wall to finish the group.
Step 5
The right-hand side of row 2 has to be a sum group, since we’ve already established that previously. The clue in row 2 states it needs to sum to 5, so we definitely need to extend the group left. However, our previous loop-building efforts helped us establish that R2C4 is an interior cell, so we only have space for one more digit in the sum group: 4. Let’s add our walls as well.
Step 6
Column 5’s second clue is 10, and since it’s going to be outside the loop, it’ll be a sum group. Just knowing that, we can plot out that the group will need an additional cell, and that it’s neighbor in column 6 will need to extend down to be able to connect to the rest of the loop at some point.
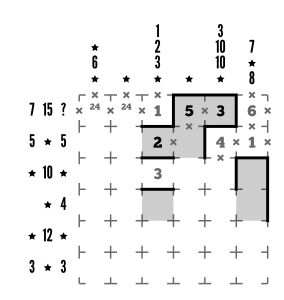
Step 7
Let’s think through the rest of column 5 next. After our group that sums to 10, we need a new group that has a product of 10. What options do we have? 2×5 and 1x2x5. Either option we end up using will mean 2 and 5 are off the table as far as the sum group goes. The only remaining possibility is that the sum group is 4+6, so we can enter that and complete the sum group. We can also mark that the next two cells will be inside the loop, but we don’t know yet if that 1 will be in the product or on its own at the bottom.

Step 8
Actually, row 4 has a clue that can help us with that! Row 4 ends in a product of 4, made from two digits, and 2 and 5 aren’t going to work here. So we can drop in the 1 and 4, mark R6C5 as part of the product group, and do some serious loop-building up and to the left after we block off the 1×4 group.
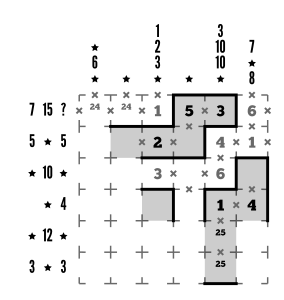
Step 9
To finish up column 6, we can try to figure out if the 8 clue next. 8 is greater than our highest digit, so it’ll require at least a group of two digits. However, anything more than two digits will put us in the same product group with the 4 and the blank cell above it, and multiplying 2x3x4x5 is definitely too high for the 8 clue! Instead, we can make 8 as a sum of 3+5, place the 2 in the remaining cell, and place the remaining adjacent loop walls needed.
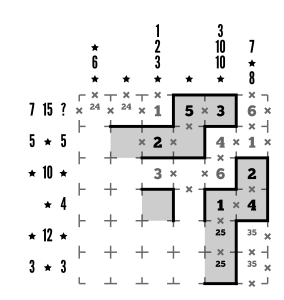
Step 10
Row 6 ends with a 3 clue, and that’s good enough to resolve the 3+5 group, which then uses latin square logic to resolve the 1x2x5 group next to it. Score!
Step 11
Row 2’s clues can now be resolved pretty quickly. It has to start with a group that has a sum or product of 5. Will that work if it’s a product group with the three cells beside it? Nope. So let’s mark that 5, add the loop wall to the right, and extend the loop interior down.
Step 12
Let’s use Latin Square logic and add the remaining 5s!
Step 13
Row 6 needs a group that makes 3, and we’ve already used our 3, which leaves one option: 1+2. We can quickly fill that in and add some loop segments.
Step 14
Notice that we have pairs on the left side of rows 1 and 6 that each contain a 2? Between those pairs, row 4 only has one space left for a 2, R4C4.
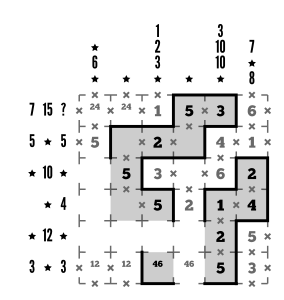
Step 15
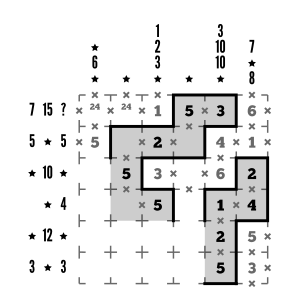
To satisfy the 10 clue in row 3, we can’t use products since 2 and 5 are split apart in this row. With sums as the only option left, we’re forced to make the middle sum group total 10, so we can place 1 and R3C4 and place the remaining 4 ar R3C1. We’re not sure yet if that’s in or out of the loop, though. Let’s also go ahead and throw in our pairs and trios since we have things narrowed down quite a bit.

Step 16
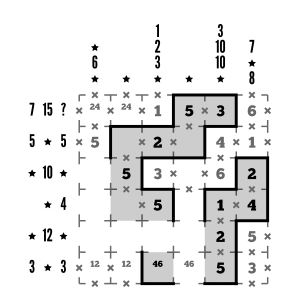
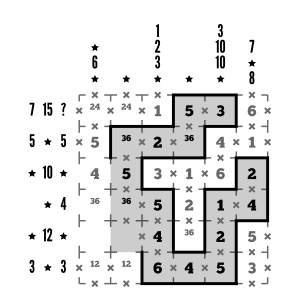
Let’s talk loops. To connect that lower-right chunk to the rest of the loop, R5C3 has to be inside the loop. Once we’ve shaded that cell, we see that the space to the left of R5C3 no longer fits enough digits to sum to 12. We’re now stuck finding a group that has a product of 12. Where is that 12 going to form?
R5C5 could extend to the left and form a group, but we quickly find that the options in R5C3 don’t work with the 2 in R5C5: 2×4 makes 8, and 12 is not a multiple of 8. 2×6 makes 12, but we’d still need to jam in a 3 or 6 from R5C4, so no dice. We also can’t use R5C4 without bringing R5C5 with it, so both of those need to be left out of the 12.
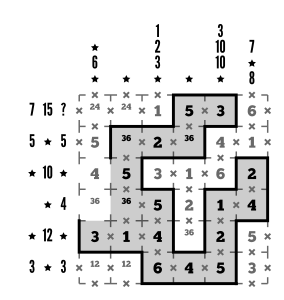
With R5C3 as an inside cell, there’s not enough room for another inside group to the left of it, so R5C3 is definitely in. Let’s add a wall to the right of it. We can also deduce that, since the 2 is in a different group, R5C3 can’t be a 6 and still make 12. So let’s drop in the 4 there, resolve the neighboring 4/6 pair, and build the loop connection down and around.
Step 17
Finish the 12! We need to use either 1x3x4 or 3×4. Since column 2 already has a pair of cells claiming the 3, R5C2 needs to be a 1, and our product group becomes 1x3x4.
Step 18
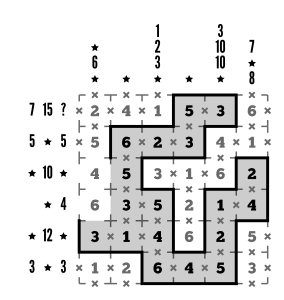
We can now use Latin square logic to fill out the rest of the numbers!
Step 19
Last but not least, to satisfy the clues for column 1, we need a group that makes 6 somewhere. There’s only one viable space for that: 6 by itself. Once we block it off from its neighbors above and below, the rest of the loop falls into place. Ta-da!
Done!
That was a long one! Hope you enjoyed solving along with me. Don’t forget, there are four more Times Zone puzzles at The Griddle waiting to be solved. I’ll also be sharing some new Times Zone puzzles here on Perplexible that were written by fellow members of The Puzzlers’ Club who decided to run with the concept. Keep an eye out!